Tuesday, December 30, 2014

Login With Facebook Usinf Facebook SDK & Get Data of User


Configure .Plist File

In .Plist File
Add FacebookAppID
Eg. open Info.plist file 

Add new Row & Add like this.
FacebookAppID : string :  1376543139268660


This FacebookAppID Number
 you can get from 
Registering your Application From Facebook API.

For More Info Click here

Follow step given in Facebook link & you can get Facebook App ID & Set it in .PList File.


Download Facebook SDK & Import it.

in ViewController .h file
Add below Code.

#import <FacebookSDK/FacebookSDK.h>

@property (weak, nonatomic) IBOutlet UIButton *btnFacebook;
- (IBAction)btnFacebook:(id)sender;
@property (weak, nonatomic) IBOutlet UIImageView *profilePictureView;

// In your view header file:
@property (weak, nonatomic) IBOutlet FBLoginView *loginView;
@property (retain, nonatomic) IBOutlet UIWebView *tempWebView;
@property (weak, nonatomic) IBOutlet UIActivityIndicatorView *activityIndicator;

in ViewController .m file
Set Delegate in ViewController Like this.
@interface LoginViewController ()<FBLoginViewDelegate>

@synthesize btnFacebook,profilePictureView,tempWebView;

- (IBAction)btnFacebook:(id)sender {
        NSLog(@"BTN_Facebook");
        
        //set Read Permissions to Facebook SDK
        FBLoginView *loginView =
        [[FBLoginView alloc] initWithReadPermissions:
         @[@"public_profile", @"email", @"user_friends"]];
        loginView.delegate = self;
        
        //set frame
        loginView.frame = CGRectMake(30, 226, 260, 53);
        for (id obj in self.loginView.subviews)
        {
            if ([obj isKindOfClass:[UIButton class]])
            { 
                //Create Custom Login Button USing ByDefault Image of Facebook given in SDK
                UIButton * loginButton =  obj;
                UIImage *loginImage = [UIImage imageNamed:@"signfacebook.png"];
                [loginButton setBackgroundImage:loginImage forState:UIControlStateNormal];
                [loginButton setBackgroundImage:nil forState:UIControlStateSelected];
                [loginButton setBackgroundImage:nil forState:UIControlStateHighlighted];
                [loginButton setTitle:nil forState:UIControlStateSelected];
                [loginButton setTitle:nil forState:UIControlStateHighlighted];
                [loginButton sizeToFit];
            }
            if ([obj isKindOfClass:[UILabel class]])
            {
                UILabel * loginLabel =  obj;
                loginLabel.text = @"";
                loginLabel.textAlignment = NSTextAlignmentCenter;
                loginLabel.frame = CGRectMake(0, 0, 271, 37);
                [loginLabel removeFromSuperview];
            }
        }
        loginView.delegate = self;

        //Add in View
        [self.view addSubview:loginView];
        ///
    }

Then After Set Delegate method of Facebook SDK FBLoginView

// This method will be called when the user information has been fetched
- (void)loginViewFetchedUserInfo:(FBLoginView *)loginView
                            user:(id<FBGraphUser>)user
{
    NSLog(@"facebook user Id %@",user.id);
    NSLog(@"facebook name=%@",user.name);
    NSLog(@"facebook email=%@",[user objectForKey:@"email"]);
    NSLog(@"facebook first_name=%@",[user objectForKey:@"first_name"]);
    NSLog(@"facebook last_name=%@",[user objectForKey:@"last_name"]);
    NSLog(@"facebook id=%@",[user objectForKey:@"id"]);
    
    // to get profile picture add this code
    
    
    //for image scale use type -> {square,small,normal,large}
    NSString *str=[NSString stringWithFormat:@"https://graph.facebook.com/%@/picture?type=normal",[user objectForKey:@"id"]];
    NSLog(@"str= %@",str);
    
    //download image from url
    UIImage *img=[UIImage imageWithData:[NSData dataWithContentsOfURL:[NSURL URLWithString:str]]];
    
    //set image to Imageview
    self.profilePictureView.image=img;
}
- (void)loginViewShowingLoggedInUser:(FBLoginView *)loginView
{

}
// Logged-out user experience
- (void)loginViewShowingLoggedOutUser:(FBLoginView *)loginView
{
    NSLog(@"You're not logged in!");
}
// Handle possible errors that can occur during login

- (void)loginView:(FBLoginView *)loginView handleError:(NSError *)error
{
    // no action can be done on facebook if there is no session on open state
    if (!FBSession.activeSession.isOpen)
    {//[@"public_profile", @"email", @"user_friends"
        FBSession *session = [[FBSession alloc] initWithPermissions:@[@"publish_stream",@"email",@"user_photos"]];
        [FBSession setActiveSession:session];
        
        // Here this behavior garantees that the iOS Login Dialog is not shown, because it was causing some login issues
        // The fallback flow will be: 1- Facebook App Native Login Dialog; 2- Facebook App Web Login Dialog; 3- Mobile Safari Login Dialog
        [[FBSession activeSession] openWithBehavior:FBSessionLoginBehaviorWithNoFallbackToWebView
                                  completionHandler:^(FBSession *session, FBSessionState state, NSError *error)
         {
             
             if(error)
                 
             { // your code here
                 
                 NSString *alertMessage, *alertTitle;
                 
                 // If the user should perform an action outside of you app to recover,
                 // the SDK will provide a message for the user, you just need to surface it.
                 // This conveniently handles cases like Facebook password change or unverified Facebook accounts.
                 if ([FBErrorUtility shouldNotifyUserForError:error]) {
                     alertTitle = @"Facebook error";
                     alertMessage = [FBErrorUtility userMessageForError:error];
                     
                     // This code will handle session closures that happen outside of the app
                     // You can take a look at our error handling guide to know more about it
                     // https://developers.facebook.com/docs/ios/errors
                 } else if ([FBErrorUtility errorCategoryForError:error] == FBErrorCategoryAuthenticationReopenSession) {
                     alertTitle = @"Session Error";
                     alertMessage = @"Your current session is no longer valid. Please log in again.";
                     
                     // If the user has cancelled a login, we will do nothing.
                     // You can also choose to show the user a message if cancelling login will result in
                     // the user not being able to complete a task they had initiated in your app
                     // (like accessing FB-stored information or posting to Facebook)
                 } else if ([FBErrorUtility errorCategoryForError:error] == FBErrorCategoryUserCancelled) {
                     NSLog(@"user cancelled login");
                     
                     // For simplicity, this sample handles other errors with a generic message
                     // You can checkout our error handling guide for more detailed information
                     // https://developers.facebook.com/docs/ios/errors
                 } else {
                     alertTitle  = @"Something went wrong";
                     alertMessage = @"Please try again later.";
                     NSLog(@"Unexpected error:%@", error);
                 }
                 
                 if (alertMessage) {
                     [[[UIAlertView alloc] initWithTitle:alertTitle
                                                 message:alertMessage
                                                delegate:nil
                                       cancelButtonTitle:@"OK"
                                       otherButtonTitles:nil] show];
                 }
                 
                 
             }
             else
             { // your code here
                 
                 NSLog(@"no error in Login with Facebook..");
             }
             
         }];
    }
    //////-------------------
}

Monday, December 29, 2014

Login With Facebook without Facebook SDK & get Profile Picture of User.

First Import this Library Files in View Controller.
You can Download Library Like "SDWebImage & SVProgressHUD" from GitHub .


#import "UIImageView+WebCache.h"    // Import SDWebImage Library into your Project
#import "UIButton+WebCache.h"
#import <Accounts/Accounts.h>             //Add framework
#import  <Social/Social.h>                     //Add framework
//not compulsory                                                                                                       /*#import "SVProgressHUD.h" */ // Import SVProgressHUD Library into your Project


 #pragma -mark FaceBook

-(void)getFacebookAccount
{
   /* [SVProgressHUD showWithMaskType:SVProgressHUDMaskTypeGradient];*/
  
    if(!_accountStore)
        _accountStore = [[ACAccountStore alloc] init];
  
    ACAccountType *facebookTypeAccount = [_accountStore accountTypeWithAccountTypeIdentifier:ACAccountTypeIdentifierFacebook];
  
    NSArray *fbAccounts =[[NSArray alloc]init];
    fbAccounts= [_accountStore accountsWithAccountType:facebookTypeAccount];
  
    if (![SLComposeViewController isAvailableForServiceType:SLServiceTypeFacebook] )
    {
        // set Alert View 
        UIAlertView *alt=[[UIAlertView alloc]initWithTitle:@"Please set Facebook account in Setting" message:@"There is no facebook account set in setting" delegate:nil cancelButtonTitle:@"Ok" otherButtonTitles: nil];
        [alt show];
      
       /* [SVProgressHUD dismiss];*/
        return;
    }
  
    NSDictionary *options = [[NSDictionary alloc] initWithObjectsAndKeys:
                             FaceBook_ID, ACFacebookAppIdKey,FBpermition , ACFacebookPermissionsKey,nil];
  
    [_accountStore requestAccessToAccountsWithType:facebookTypeAccount  options:options
                                        completion:^(BOOL granted, NSError *error)
     {
         if(granted)
         {
             NSArray *accounts = [_accountStore accountsWithAccountType:facebookTypeAccount];
             _facebookAccount = [accounts lastObject];
           
             [_accountStore renewCredentialsForAccount:_facebookAccount completion:^(ACAccountCredentialRenewResult renewResult, NSError *error) {
             }];
           
             [self FB_Detail];
         }
         else
         {
            /* [SVProgressHUD dismiss]; */
         }
     }];
}

//Get Facebook Profile Picture

-(void)FB_Detail
{
    NSURL *meurl = [NSURL URLWithString:@"https://graph.facebook.com/me/picture"];
  
  
    SLRequest *merequest = [SLRequest requestForServiceType:SLServiceTypeFacebook
                                              requestMethod:SLRequestMethodGET URL:meurl   parameters:nil];
    merequest.account = _facebookAccount;
  
    [merequest performRequestWithHandler:^(NSData *responseData, NSHTTPURLResponse *urlResponse, NSError *error)
     {
         dispatch_async(dispatch_get_main_queue(), ^{
         // download Image from Facebook
             UIImage *image= [UIImage imageWithData:responseData];
           
             [btnUserProfile setBackgroundImage:image forState:UIControlStateNormal];
            /* [SVProgressHUD dismiss]; */
         });
     }];
}

Thursday, December 25, 2014


Introduction to CocoaPods 

WHAT IS COCOAPODS ?

CocoaPods is “the best way to manage library dependencies in Objective-C projects.” It has thousands of libraries and can help you scale your projects elegantly. CocoaPods is a reflection on the Cocoa community, a mirror that reflects the effort of thousands on individual contributions to a greater idea of sharing and helping each other to improve. 

You specify the dependencies for your project in one easy text file named "Podfile" in Your Project Folder. CocoaPods resolves dependencies between libraries, fetches source code for the dependencies, and creates and maintains an Xcode workspace to build your project. Ultimately, the goal is to improve discoverability of, and engagement in, third party open-source libraries, by creating a more centralized ecosystem. Installing and updating CocoaPods is very easy. 

Instead of downloading code from GitHub and copying it into your project (and thus making future updates difficult), you can let CocoaPods do it for you.

How to Implement & Use Podfile in Project ?


To get started, you first need to install CocoaPods. CocoaPods runs on Ruby.

To do so, open Terminal and type the following command:

sudo gem update --system

Enter your password when requested. The Terminal output should look something like this:


Next, you need to install CocoaPods. Type this command in Terminal to do so:

sudo gem install cocoapods


Lastly, enter this command in Terminal to complete the setup of CocoaPods:

pod setup


Check & Set Directory in terminal Like this :

cd /Users/mac-mini/Downloads/DemoApp
pod init
open -a Xcode Podfile

You can see in Project File  ->>>


after that, Open Pod File. you have to add library name & Version OR Library name in PodFile.
Example,

# platform :ios, ‘7.0’
target 'DemoApp’ dopod 'MBProgressHUD'pod 'Reachability'end
target 'DemoAppTests' do
end


After Completing these Save The File .
Back to Terminal & Write :

pod install


& done.


Then after Close Xcode & open DemoApp.xcworkspace always

Note:- To use Pod library files always do not open DemoApp.xcworkspace but always open BlurDemo.xcworkspace & open project & then import files in ViewConroller.m & Enjoy Coding.

If you want to Update Pod Use below Commant :

pod update

So, Revise all. From Beginning Finally you have to Write Below Code :

sudo gem update --systemsudo gem install cocoapodspod setupcd /Users/mac-mini/Downloads/DemoApp   //Change Directory to your Project Filepod initopen -a Xcode Podfile

//& Add Library Pod Name like , 
pod 'MBProgressHUD'pod 'Reachability'

& save PodFile .

Then 
pod install


& open Xcode Project File -> DemoApp.xcworkspace & Import Library into ViewController .

You can also Search Pod file of any Library like :

pod search sdwebimage


If you wan to Update the Pod then Simple use:

pod update

& if u want to remove any Library then just remove it PodFile  & save & the Update it. 
It will successfully Remove from your Project.

Enjoy Coding.

After Using Pod , you do not need to download Library file & Add files to Project.
Pod file Automatically download Latest Version Of Library From Github.


Tuesday, December 23, 2014

Swift: A new programming language for iOS and OS X.

WelCome TO Swift

Introduction to Swift

Swift is an innovative new programming language for Cocoa and Cocoa Touch. Writing code is interactive and fun, the syntax is concise yet expressive, and apps run lightning-fast. Swift is ready for your next iOS and OS X project — or for addition into your current app — because Swift code works side-by-side with Objective-C.


With the release of Xcode 6.1 and iOS 8, Swift 1.1 is final, and you can build and submit your iOS apps written with Swift to the App Store


The Basics 

Swift does away with the standard of declaring variables by starting with their type names, and instead opts to use a Javascript-like ‘var’ keyword to define any variable.
    So for instance in Objective-C where you have this:


NSString *myString = @"This is my string.";
    You now have this:

var myString = "This is my string."

Meanwhile constants are expressed with the ‘let’ keyword


let kSomeConstant = 40
In this case kSomeConstant is implicitly defined as an integer. If you want to be more specific you can specify which type it is like so:


let kSomeConstant: Int = 40

With both arrays and dictionaries, they are described using brackets [ ]


var colorsArray = ["Blue", "Red", "Green", "Yellow"]
var colorsDictionary = ["PrimaryColor":"Green", "SecondaryColor":"Red"]


There’s a lot more to go over, but I think these basics are important to get a start going on to the tutorial. So with that, let’s move on to Hello World.


EX.
Hello World
First, we’re going to write the simplest app imaginable to get started, Hello World. Our app will only do one thing: print “Hello World” to the console.
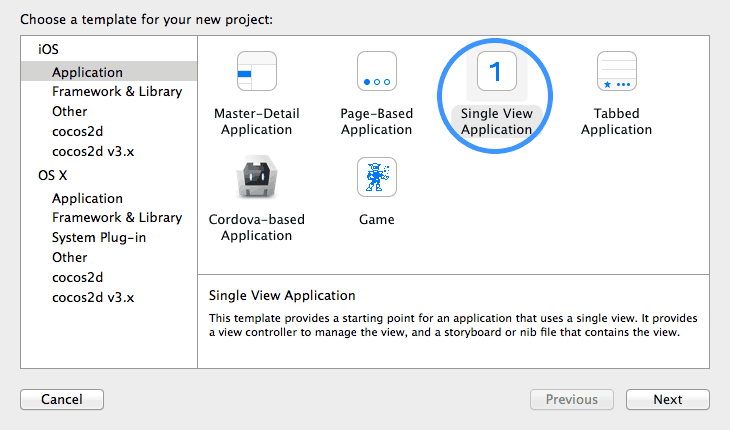
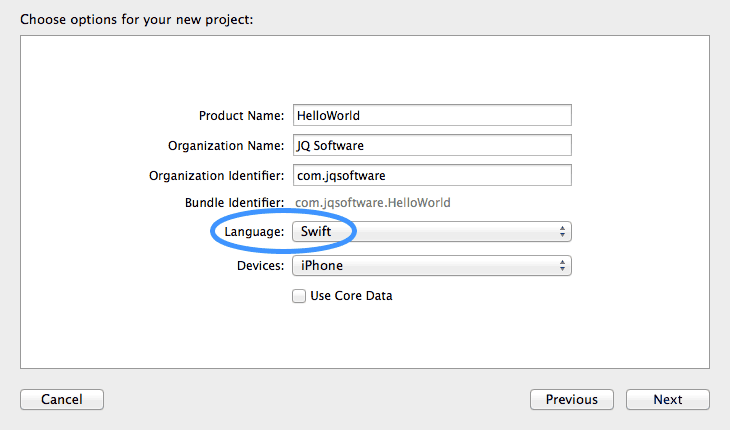
Set up an Xcode project using the single-view application template, and make sure you opt for Swift as the language.


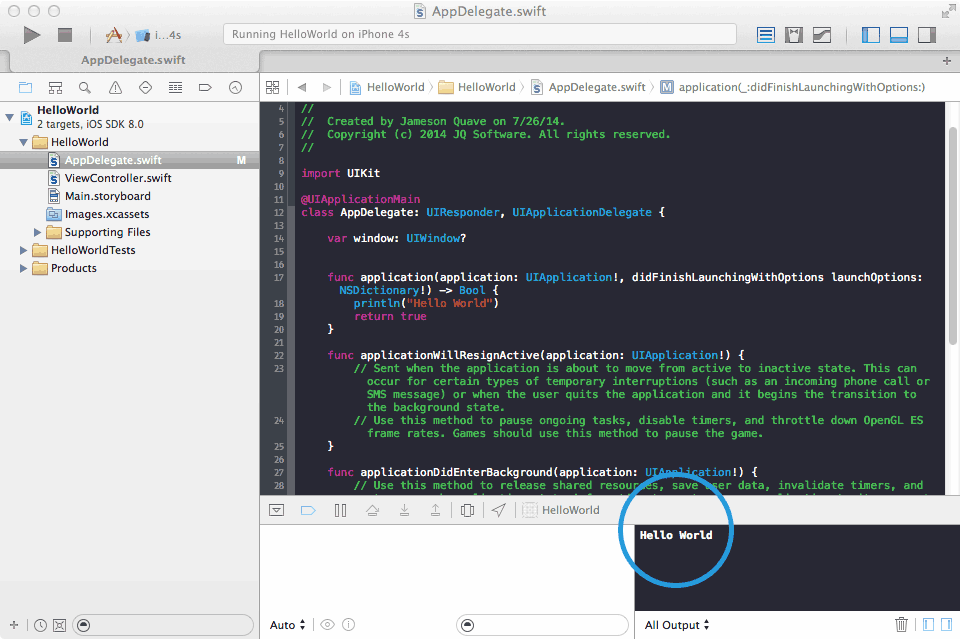
You should now find an AppDelegate.swift file in the project hierarchy
IN didFinishLaunchingWithOptions write below code.

println("Hello World")

Now press run and you should see a blank app boot up, and the words “Hello World” print to the console.
Note that this will not show up in the iPhone simulator. Look at the bottom of your Xcode window and you’ll see a console that says ‘Hello World!’.


Adding a Table View

In this section, we’re going to actually put some stuff on the screen, yay!
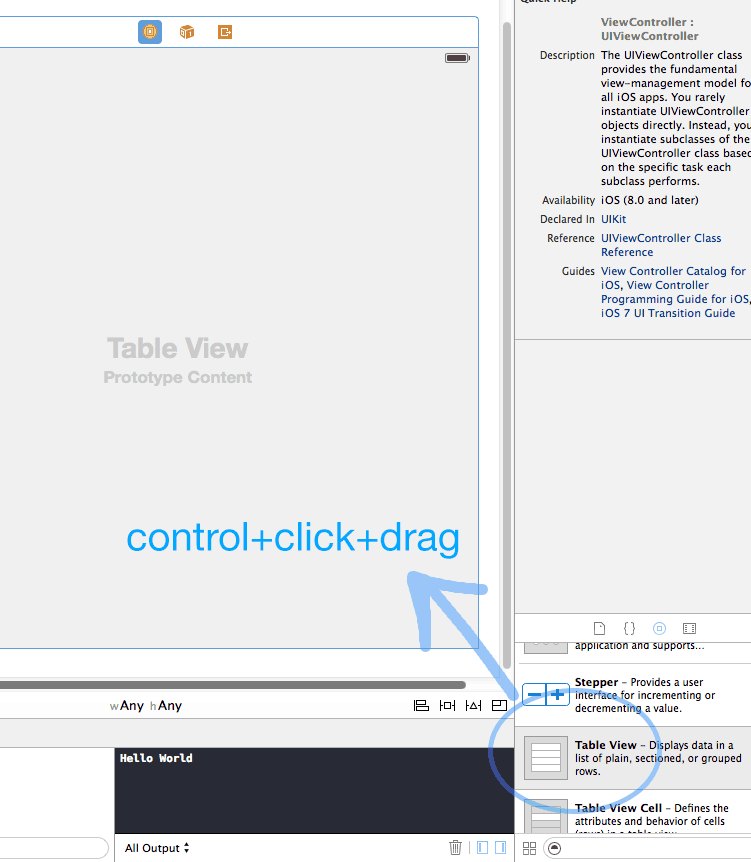
Open up your Main.storyboard file in Xcode and lets drag in a “Table View” object from the Object Library (don’t use a table view controller.) Position this fullscreen in your app window and make sure it lines up with the edges.

Then resize the height by dragging down the top edge and giving a little bit of space (this gives room for the status bar at the top of the phone.) If you run the app at this point, you should see an empty table view in the simulator.


NOW, in ViewController.swift add Data Source & Delegate :

class ViewController: UIViewController, UITableViewDataSource, UITableViewDelegate {

& then modify our View Controller class by adding these two functions for UITableView methods

func tableView(tableView: UITableView, numberOfRowsInSection section:    Int) -> Int {
   return 10
}
func tableView(tableView: UITableView, cellForRowAtIndexPath indexPath: NSIndexPath) -> UITableViewCell {
   let cell: UITableViewCell = UITableViewCell(style: UITableViewCellStyle.Subtitle, reuseIdentifier: "MyTestCell")

   cell.textLabel?.text = "Row #\(indexPath.row)"
   cell.detailTextLabel?.text = "Subtitle #\(indexPath.row)"

   return cell
}

The first method is asking for the number of rows in our section, in this simple tutorial we just hard-code 10, but normally it would be the length of an array controller. This example is intentionally simple.

The second method is where the magic happens. Here we create a new instance of a UITableViewCell called cell, using the Subtitle cell style.
Then, we assign the text value of this cell to the string “Row #\(indexPath.row)”
In Swift, this is how variables are embedded within a string. What we’re doing is retrieving the value of indexPath.row by inserting \(indexPath.row) in to our string, and dynamically replacing it with the row number of the cell. This allows results such as “Row #1″, “Row #2″, etc.
The detail text label is only available in the Subtitle cell class, which we are using here. We set it similarly to “Subtitle #1″, “Subtitle #2″, and so on.

So, Complete Code is Given Below.
import UIKit

class ViewController: UIViewController, UITableViewDataSource, UITableViewDelegate {
    
    func tableView(tableView: UITableView, numberOfRowsInSection section: Int) -> Int {
        return 10
    }
    
    func tableView(tableView: UITableView, cellForRowAtIndexPath indexPath: NSIndexPath) -> UITableViewCell {
        let cell = UITableViewCell(style: .Subtitle, reuseIdentifier: "MyTestCell")
        
        cell?.textLabel?.text = "Row #\(indexPath.row)"
        cell?.detailTextLabel?.text = "Subtitle #\(indexPath.row)"
        
        return cell!
    }
    
    override func viewDidLoad() {
        super.viewDidLoad()
    }
    
    
    override func didReceiveMemoryWarning() {
        super.didReceiveMemoryWarning()
    }
}

//Output --------------->>>


Go ahead and run your app and you’ll now see an amazing list of cells with titles and subtitles indicating their row numbers. This is one of the most common ways to display data in iOS, and will be sure to serve you well.

For More info about Swift ,  Click Here


iOS Quick Tip: 5 Tips to Increase App Performance

In this quick tip,  five tips to improve application performance.

1. Caching


2. Do Not Block the Main Thread


3. Lazy Loading


4. Measure Performance


5. Stress Testing


1. Caching

If an iOS application fetches a remote resource, it is important that it doesn't fetch that same resources every time it needs to access it. If you plan to develop a Twitter client for iOS, for example, then the client shouldn't be downloading the same avatar every time it needs to display it. Caching the avatar will significantly improve application performance.
What is caching? The basic idea of caching is simple. When the application fetches a remote resource for the first time, it stores a copy of that resource on disk for later use. If that same resource is needed later, the application can load it from disk instead of fetching it remotely. The added benefit is that the resource is also available when the device is not connected to the web. The complex aspect of caching is how to store the resource, when to store it, and, most importantly, when to refresh it.
Olivier Poitrey has developed a small library named SDWebImage that is aimed at caching images. It provides a category on UIImageView much like AFNetworkingdoes. The key difference is that SDWebImage caches the images it downloads. Images are downloaded in the background and each images is decompressed, resulting in faster load times. The library leverages Grand Central Dispatch to keep the main thread responsive. If your application works with remote images, then you should take a look at this gem.


2. Do Not Block the Main Thread

One of the most important lessons to learn when developing for the iOS platform is to never block the main thread. If you block the main thread with a long running operation, such as downloading images or other resources, your application will become unresponsive as long as the operation isn't completed. Make it a habit to move long running tasks to a background thread. Even if you only need a handful of bytes, if the device's connection to the web is slow, the operation will still block the main thread.
Writing safe multithreaded code has become a lot easier with the introduction of Grand Central Dispatch. Take a look at the following code snippets. The first snippet downloads data on the main thread, while the second snippet leverages Grand Central Dispatch to perform the same task on a background queue.

NSData *data = [NSData dataWithContentsOfURL:URL];
UIImage *image = [UIImage imageWithData:data];
[imageView setImage:image];

dispatch_queue_t queue = dispatch_queue_create("downloadAsset",NULL);

dispatch_async(queue, ^{
    NSData *data = [NSData dataWithContentsOfURL:URL];

    dispatch_async(dispatch_get_main_queue(), ^{
        UIImage *image = [UIImage imageWithData:data];
        [imageView setImage:image];
    });
});

3. Lazy Loading

Being lazy isn't always bad especially if you are a programmer. Lazy loading is a well known concept in software development. It simply means that you postpone the instantiation of an object until you need the object. This is advantageous for several reasons. Depending on the object and the cost for instantiation, it can dramatically improve application performance and memory usage. Lazy loading objects isn't a difficult concept. The simplest implementation of this pattern is overriding the getter of a property as shown below.

- (MyClass *)myObject {
    if (!_myObject) {
        _myObject = [[MyClass alloc] init];
    }

    return _myObject;
}

The lazy loading pattern can be applied in many areas of software development. For example, if part of your application's user interface is not shown by default, it may be advantageous to postpone its instantiation until that part is about to be shown.
Table and collection views use a combination of caching and lazy loading to optimize performance. If the next cell or item is about to be displayed on screen, the table or collection view looks for a cell or item it can reuse (caching). Only if no reusable cell or item is available will the table or collection view (or its data source) instantiate a new cell or item (lazy loading).


4. Measure Performance

If you notice that your application is slow at times and you want to find out what is causing it, then you may need to profile your application with a tool such as Instruments. Colin Ruffenach wrote a nice tutorial about time profiling with Instruments on Mobiletuts+.
If Instruments doesn't give you a clear answer, you may be interested inMGBenchmark, a benchmarking library developed and maintained by Mattes Groeger. This compact library lets you measure how fast your code executes and it helps you to track down the bottlenecks in your code base. It actually complements Instruments quite well so you shouldn't use one or the other. Mattes Groeger's library comes with an extensive feature set and is remarkably powerful. I highly recommend it as an alternative or complement to Instruments.


5. Stress Testing

If you're developing an application that works with lots of data, then it is important to test it with...well...lots of data! During the development of an application, it isn't always easy or possible to imagine how your users are going to use your application, but it is good to put it through its paces before releasing it. Your application may perform admirably during development and perform terribly in situations where it is flooded with data. You probably won't be able to predict, let alone test, all the circumstances in which your application will be used, but you can try to mimic common situations by creating data sets to test with.
I often create a small script or class that populates the application with test data to measure how well it performs with a lot of data. Ideally, you want to populate the application with more test data than an average user will have - to the extent that you can predict this during development. When I was developing Pixelsync, an iPad application that interfaces with Aperture and iPhoto, I created an Aperture library with close to 500,000 images. If Pixelsync performed well with a photo library of that size, I could be fairly confident that the average user wouldn't run into performance issues.
If you really are a lazy developer or you just don't have enough time, then you can also be more creative by building a robot to do the job for you.


Conclusion


Application performance remains an essential aspect of software development despite the fact that the new generation of devices are much more powerful and capable. Blocking the main thread, for example, will always result in a bad user experience no matter how capable the device is.